WordPress file upload size
One of the most important things to consider when managing a website on the WordPress platform is the file upload size. WordPress’s default file upload size is usually relatively small, usually between 2MB & 150MB, depending on your web host. This can cause problems for users trying to upload large files such as images, videos, or documents.
In this post, we will explore the importance of file upload size in WordPress and provide a comprehensive guide on increasing it.
Understanding the default file upload size in WordPress
The default file upload size in WordPress is determined by the server’s PHP settings. For example, a typical PHP installation has a default file upload size limit of 2MB. This can be a problem if you need to upload larger files.
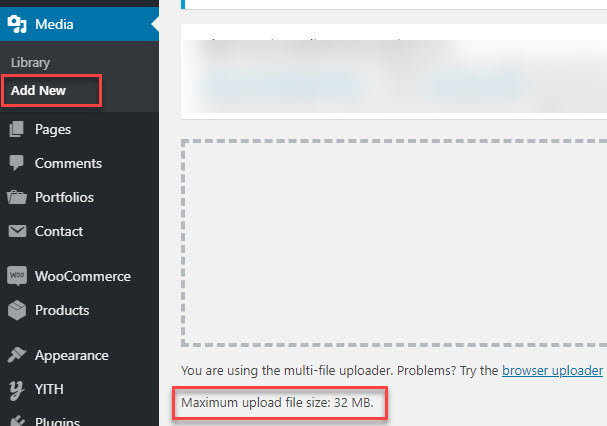
To check the current file upload size limit on your website, you can install a plugin called “Media File Size Info”, which will show you the file size limit on the Media Library page. Or you can simply go to Media > Add New, and you will see the maximum file upload size limit for your WordPress website.
Methods for increasing file upload size in WordPress
There are several methods for increasing the file upload size in WordPress. The three most common methods are editing the php.ini file, using a plugin, adding to functions.php and modifying the .htaccess file. Each method has its advantages and disadvantages, and in this section, we will explore each method in detail.
4 ways to fix WordPress file upload limit
There are 4 methods to modify or increase the file upload limit. The .htaccess is probably the best way if you are proficient with code and have some experience with .htaccess files.
1. htaccess method
The final method for increasing the file upload size in WordPress is to modify the .htaccess file. (Please see what is .htaccess if you are not sure) The .htaccess file is a configuration file that controls many aspects of the server’s behaviour, including the file upload size limit. To modify the .htaccess file, you must access your server via FTP or cPanel.
Once you have accessed the file, you can add the following code:
php_value upload_max_filesize 64Mphp_value post_max_size 64Mphp_value max_execution_time 300php_value max_input_time 3002. Create or edit an existing PHP.INI file
Editing the php.ini file is one of WordPress’s most popular ways to increase the file upload size. The php.ini file is a configuration file for PHP, and it controls many aspects of PHP’s behaviour, including the file upload size limit.
To edit the php.ini file, you will need to access your server via FTP or cPanel. Once you have accessed the file, you can change the value of the upload_max_filesize variable. For example, if you want to increase the file upload size limit to 10MB, you would change the value to “10M”.
It’s essential to remember that changes to the php.ini file will affect all the sites hosted on the server, so it’s crucial to be careful when making changes.
In most cases, you will not see a php.ini file in your root directory. If you don’t, create a file called php.ini using Notepad, Notes, Sublime Text, EditPlus or Notepad++ and upload it to the root folder. Edit this file and add the following code:
upload_max_filesize = 64Mpost_max_size = 64Mmax_execution_time = 3003. Theme functions.php
There are times where we have seen that by adding the following code to your theme’s functions.php file, preferably your child theme’s function.php file, you can increase the upload size:
@ini_set( 'upload_max_size' , '64M' );@ini_set( 'post_max_size', '64M');@ini_set( 'max_execution_time', '300' ); If you’re not comfortable editing files directly, several WordPress plugins can help increase your upload limit. This is the most user-friendly approach, though it might not work with all hosting configurations.
Option 1: Increase Maximum Upload File Size plugin
- Go to Plugins → Add New in your WordPress dashboard
- Search for “Increase Maximum Upload File Size”
- Install and activate the plugin
- The plugin will automatically attempt to increase your upload limits
Option 2: WP Maximum Upload File Size
- Go to Plugins → Add New in your WordPress dashboard
- Search for “WP Maximum Upload File Size”
- Install and activate the plugin
- Navigate to Settings → WP Maximum Upload File Size to configure your desired limits
Note: Plugin methods may not work on all hosting environments, particularly those with strict security settings. If plugin solutions don’t work, please try one of the manual methods described above.
Host-specific instructions
Different hosting providers have different ways of managing PHP configuration. Here are specific instructions for some popular WordPress hosting providers:
Hosting provider recommendations
cPanel hosting
If your host uses cPanel, you can often change PHP settings directly:
- Log in to cPanel
- Find and click on “Select PHP Version” or “PHP Configuration”
- Look for upload_max_filesize, post_max_size, and memory_limit
- Change these values and save your settings
Managed WordPress hosting
For managed WordPress hosts like WP Engine, Kinsta, or Flywheel:
- Log in to your hosting dashboard
- Look for PHP configuration settings
- Some hosts may require you to contact support to change these limits
Shared hosting considerations
On shared hosting, you might be limited by server-wide settings that you cannot override. In these cases:
- Try Methods 1-4 first
- If none work, contact your hosting provider’s support
- Consider upgrading to a better hosting plan if this is a recurring issue
How to verify your changes worked
After implementing any of the methods above, you should verify that your changes have been applied successfully.
- Create a test file slightly larger than your previous limit (e.g., a large image or ZIP file)
- Go to Media → Add New in your WordPress dashboard
- Try to upload your test file
- If the file uploads successfully, your changes have worked
- You can also check the displayed maximum upload size on the same page to confirm the new limit
Pro tip: If you created a phpinfo.php file earlier, you can check it again to verify that the PHP settings have been updated correctly.
Troubleshooting common issues
Changes not taking effect
If your changes aren’t working:
- Your hosting provider might be overriding your settings at the server level
- PHP might be running in a mode that doesn’t allow these settings to be changed through the methods you’ve tried
- There might be syntax errors in your code modifications
Solution: Try a different method from our list, or contact your hosting provider for assistance.
White screen after making changes
If you see a white screen or your site stops working:
- Restore your backup files immediately
- Check for syntax errors in your modifications
- Ensure you’ve placed the code in exactly the right location
Solution: Always make backups before editing configuration files!
Uploads still failing despite increased limits
If you’ve verified the limits are increased, but uploads still fail:
- Your hosting provider may have additional security measures in place
- There might be issues with file permissions
- Your server might have a firewall blocking large uploads
Solution: Contact your hosting provider’s support team for server-level issues.
Best practices for file uploads in WordPress
While it’s possible to increase your upload size limits, it’s also important to follow these best practices:
Optimise your files before uploading
Large files can slow down your website and consume storage space. Consider:
- Compressing images using tools like TinyPNG or the Smush plugin
- Converting videos to more efficient formats
- Using external services like YouTube or Vimeo for video content
Balance convenience and performance
Just because you can upload larger files doesn’t mean you always should. Large media files can:
- Slow down your page load times
- Consume your hosting storage space
- Create backup and migration challenges
Consider using a CDN
If you frequently work with large media files, consider using a Content Delivery Network (CDN) like Cloudflare or BunnyCDN to:
- Reduce the load on your main server
- Improve global load times
- Handle large files more efficiently
Conclusion
Increasing your WordPress file upload size limit can be achieved through several methods, from editing configuration files to using plugins. The best approach depends on your specific hosting environment and technical comfort level.
Remember these key points:
- Always make backups before editing configuration files
- Start with the wp-config.php method as it’s the most universally compatible
- If one method doesn’t work, try another one
- Optimise your files before uploading, even with increased limits
- Contact your hosting provider if you continue having issues
By following this guide, you should be able to successfully increase your WordPress upload limit and work more efficiently with larger files on your website.
Have you tried any of these methods? Which one worked best for your WordPress site? Let us know in the comments below.
Frequently asked questions
Some of our most ased things:
What is the recommended upload size limit for WordPress?
For most websites, setting the upload_max_filesize to 64MB and post_max_size to 64MB provides a good balance between functionality and security. Adjust based on your specific needs.
Will increasing the upload limit affect my website’s performance?
Setting higher limits doesn’t affect performance directly, but uploading and storing large files can impact your site’s speed and storage usage. Always optimise files before uploading.
Why can’t I upload files even after increasing the limit?
There might be additional server configurations blocking large uploads, such as mod_security rules, PHP timeout settings, or hosting limitations. Contact your hosting provider if basic methods don’t work.
Is it safe to increase the upload limit?
Yes, with proper configuration. However, extremely high limits could potentially allow malicious uploads or server resource abuse. Balance convenience with security by not setting unnecessarily high limits.
Do I need to restore original settings after uploading large files?
No, it’s generally fine to keep the increased limits if they’re reasonable (e.g., 64MB-128MB). If you’ve set extremely high limits (e.g., 1GB+), consider reducing them after completing your uploads.
Other WordPress fixes

Need a price for a new website instantly
Try our website cost calculator for free and get a price emailed to you.
